Home | News | Android

Archive

. . . . . . . . . . . . . . . . . . . . . . .

Create an image skull like Ghost Rider

Wednesday, January 6, 2010

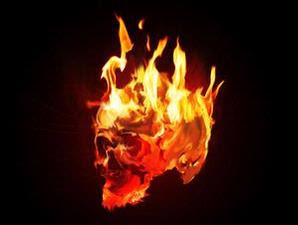
Create an image skull like Ghost RiderCreate an image skull like Ghost RiderThe skull was burning like effects in science fiction movies is the theme this time digital imaging. Although a bit smelly horror, your results are guaranteed is very cool. How to make it not too difficult.

To create a cool effect of the skull on fire, you just need a few tools in Adobe Photoshop CS4. Smudge tool, plus a refined gradient tool and a little movement with the pointer like a painting. In addition, also provide images of the skull that can be made with a vector application such as CorelDRAW or Adobe Illustrator. No need to create a complex picture and details, a simple enough way skulls skull silhouette images presented here. Do not forget, is also drawing fire prepared a black background.
Was ready to start? Let's play.
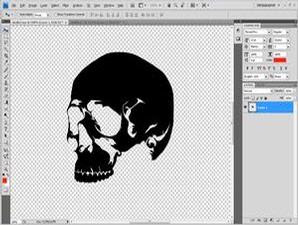
  1. Prepare a simple skull image as I making here. You can make it with another style, you know. Make a simple drawing, such as the silhouette. Use a black or white color as the base.
  2. Prepare the work area by drawing the desired size. Give the black color in the work area by pressing [Shift] + [F5] on your keyboard. Continue to choose [Black] on the menu "Use". If so, click [OK].
  3. Choose red and black, in the "Foreground color" and "Background color" in the toolbox. Select [Gradient Tool], then [Foreground to Background] and [Radial Gradient] on the menu in the toolbar gradation setting.
  4. Click-drag the pointer from the middle of the document outside the work area to appear red circle gradations. Continue with importing images into the work area of the skull. Give the name of the skull on the drawing layer.
  5. Press [Ctrl], then click on the layer "Skull" to appear around the image selection. Click the gradient tool again with fashion "Foreground to Background, but with yellow and red. Click-drag the pointer in the image of the skull.
  6. Press [Ctrl] + [D] to remove the selection. Enter the image of fire, and named the "Api1". Lower the value of this layer opacity to 80%. Continue by pressing [Ctrl] and click on the layer "Skull" again.
  7. Click the layer "Api1", then press [Shift] + [Ctrl] + [I]. Press the [Delete], so that the image of fire to form a skull image. To look dikobari fire, click [Smudge Tool]. Select the type of brush "Chalk" or "carcoal" in the menu "Brush".
  8. Press [Ctrl] + [D]. Asleep on the image layer "Api1" to form the blaze. Use a brush size variations. To increase or decrease the brush, use slidebar "Master Diameter" in the menu "Brush".
  9. Enter another fire images, and named the layer "Api2". Try drawing a lick or flames. Change the blending mode to [Screen] and position it at the top of the skull. Change the size to fit the skull.
  10. Press [Ctrl] + [T] until the box appears around the second fire. Press [Ctrl], then click-drag one corner of the box to adjust the form of fire with the skull. Continue with the other corner. If so, press [Enter] on the keyboard.
  11. The second fire was fast asleep with the Smudge tool as the previous step for forming the blaze. To form a dark-light illumination of the skull, use the [Dodge Tool] or [Burn Tool], and fell asleep on the necessary parts.
  12. Make sparks with [Brush Tool] type of hard red and small. Create a new layer and named "spark". Pulaskan on the outside of the skull, and then wipe the spark Smudge Tool.
  13. Combine all the layers. Click [Layer]> [Flatten Image]. To reinforce the color of fire, press [Ctrl] + [M]. Use the box "Curve" to confirm color. Use the preset [Linear Contrast] or [Strong Contrast], then click [OK].


Labels:

The more beautiful with Shadow Effect

The more beautiful with Shadow EffectThe more beautiful with Shadow Effect

Consider carefully a number of product advertising, particularly print advertising electronic products, such as gadgets, mobile phones, and the like. Form of what the product images show up there?

The images are created in such a way that seemed luxurious and beautiful. And the most convenient features is the impression of a reflection effect. Consider it, a number of product photos, though looks simple or without additional ornamentation, yet still keep looking good thanks to the effect of this reflection.

Reflection effects can be created in two ways, namely by generating reflection photographed (using a field that can bring such a good image with acrylic), or digitally if so reflected.

For those of you who do not have adequate equipment to create a reflection effect when taking pictures, if the digital way is worth a try. In fact, you can create this impression with ease using any imaging software. In this tutorial, I use Adobe Photoshop CS4. If you use other software, no need to be discouraged. Stages practice more or less the same, really.

It's ready to try? Let us begin.
  1. Open the image to be formed products reflections. Make sure you take a photo with the background (background) plain. If not innocent, remove the existing background by selecting an object, perform inverse, then fill the background with a plain color.
  2. Make sure your images have the space to form a reflection. If not, dilate the image by clicking on the canvas [Image]> [Canvas Size ...], or press [Alt] + [Ctrl] + [C]. In the Canvas Size box, add the photos to be more wide and long.
  3. For example the canvas size of your image is 8cm x 10cm. To create a reflection, add the length of the image to fill the bottom with a number of around 15-20 cm for the "Height", and select the arrow to the top of the "Anchor" to the canvas extends downward.
  4. Add the broad canvas photos on the "Width" if necessary. For wide, no need to specify an anchor to a proportional increase space on either side of the canvas. Select the color matches the color of the canvas background image on the "Canvas extension color:". Click [OK].
  5. Now the main image by double clicking the layer "Background", then press the [Ctrl] + [A], or click on [Layer]> [Duplicate Layer ...]. Click [OK] on the notification box that appears. Because the condition is always inverted reflection of the position of the main image, you must turn it over.
  6. Click the layer duplication, and then click [Edit]> [transform]> [Flip Vertical]. Duplicate layer will be reversed vertically. Change the layer blending mode via the drop-down menu above the Layer dialog box, it becomes [Multiply]. Shear layer to reflect directly beneath the main object.
  7. Reflection does not bring the main object intact. Generally, there are gradations in the reflection impression. To make it, use the gradient tool facilities. First, create a first mask layer by clicking layer duplication, then click on [Layer]> [Layer Mask]> [Reveal All].
  8. After the mask layer is formed, click [Gradient Tool]. Make sure the color is selected in the two boxes and color-foreground-background color is black and white. Choose mode [Black to Transparant] on the menu "Gradient Editor" on the top, then use the gradient type [Linear].
  9. Click drag the gradient tool from the bottom up until close to the main object image position on the layer mask on the duplicated layer. Look, now the object on the layer duplication appeared as vague. So do not look too sharp, a little lower layer opacity value duplication.
  10. To resemble a reflection-which usually appear not too sharp and-paste a bit vague blur effect. Click the layer duplication, not a layer mask, then click [Filter]> [Blur]> [Gaussian Blur ...]. Opaque few pictures a few points, then click [OK]. Reflection has become.
TIPS: Reflections on the Text
Effect of reflection you can also apply in the text to look more beautiful. The way not much different from the tutorial above. Fun, the text does not need to be picture-in-rasterized process so the gradient (gradient) can be applied.

To be more unique, you can add a reflection effect on the text, such as filter "Ocean Ripple" (reflected in the water bath), or filter "Glass" (reflected in the glass). For the application of filters, text or images should be made dirasterisasi. Way, stay right-click the text layer, then select [Rasterize Type].


Labels:

3-dimensional effect with photoshop

3-dimensional effect with photoshopAdobe Photoshop can be used not only to manipulate photos or images. In CS4 Extended editions, this application also provides facility to create three-dimensional images (3D). Although simple, the result was quite ciamik and practical use.

Some form of ready-made 3D, starting from the form of boxes, balls, donuts, so you can use canned. Just choose the image, click a few options, 3D images can be instantly created.

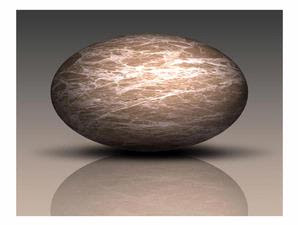
For example, I will invite you make a marble tiles (marble). Changing the texture of ceramic into a ball you can do with little steps.

It's ready to try? Let us start.
  1. Create a new image document. The size and resolution-free. If you later want to print, choose a resolution of 300 pixels / inch. If so, prepare a photo or image texture will be applied to the 3D image.
  2. I obtain this marble texture images from the Internet. With him, PCplus will make a marble from the marble. Enter the drawing by clicking [File]> [Place ...]. Find and select the image that is used, then click [Place].
  3. After the picture comes in, press [Enter]. 3D shape options available in the [3D]> [New Shape From Layer]. Here is some form of 3D that can be used directly, starting form the cube, ball, until the can of soda.
  4. To conjure the image texture of marble into a marble ball, click [3D]> [New Shape From Layer]> [Sphere]. Wait a while until the drawing ball textured 3D images of your choice appears.
  5. Now two 3D tools in the toolbox can be used already. To process the image, use the tool in the ranks of "3D Rotate Tool". This feature consists of five tools, the 3D Rotate Tool (serves to rotate the 3D shape in all directions), 3D Roll Tool (rotate 3D shapes in a single direction), 3D Pan Tool (change or shift the position of 3D), 3D Slide Tool ( change the position and size of 3D shapes), and 3D Scale Tool (change the size of the 3D shape).
  6. In order to appear more realistic, set lighting 3D shapes you create. Take advantage of 3D panel to manage the image. To bring it up, click [Window]> [3D]. To add light effects, click the tab [Filter: By Lights] with bulb icon.
  7. There are three types of lighting provided, namely Point, Spot, and Infinite. Usually, the lighting by default is Infinite. Now, to create new lighting, click the button on the sheet berikon panel "3D", then select the type of lighting needed.
  8. A new light layer will appear. Click the new layer, and set the intensity of the lighting via the "Intensity". You can set the fall of light using an existing tool in the Properties panel layers of light.
TIPS: The more realistic more good
Arange reflection can bounce back to working on more realistic appearance. Change the 3D layer into the image by right-clicking the layer in the panel "Layers", then select [Rasterize]. Duplicate the layer containing the 3D images by clicking on the layer "Background", then press the [Ctrl] + [J]. Click [OK] in the notification box that appears.

Because the condition is always inverted reflection of the position of the main image, you must rotate. Click the layer duplication, and then click [Edit]> [transform]> [Flip Vertical]. If the image requested to be changed into "Smart Layer", just click [Yes]. Duplicate layer will be reversed vertically. Change the layer blending mode-through via the drop-down menu on the Layer dialog box, the [Multiply]. Shear layer until the reflections are just below the main object.

Reflection will not bring the main object intact. Generally, there are gradations in the reflection impression. To make it, use the gradient tool facilities. First, create a first mask layer by clicking layer duplication, then click on [Layer]> [Layer Mask]> [Reveal All].

Once formed layer mask, click [Gradient Tool]. Make sure the color is selected in the two boxes and color-foreground-background color is black and white. Choose mode [Black to Transparant] on the menu "Gradient Editor" on the top, then use the gradient type [Linear].

Click drag the gradient tool from the bottom up on the layer mask on the duplicated layer to a position near the main object image. Look, now the object on the layer duplication seemed vague. So not too sharp, a little lower layer opacity value duplication.

Make a shadow fell below marbles using [Elliptical Marquee Tool]. Make an oval in a new layer below the layer marbles, black color, then give the filter [filter]> [Blur]> [Motion Blur]. Select the "Angle" 0 degrees, then the value of "Distance" maximum. Click [OK]. See the results.


Labels:

Lenovo IdeaCentre C300: Beautiful Classic Style

Lenovo IdeaCentre C300: Beautiful Classic StyleWith a beautiful design and complete facilities, Lenovo IdeaCentre A600 is an ideal representation of a PC AiO. Not long ago, the vendor re-release of his newest family IdeaCentre labeled C300. Can be traced from its name if this product is set as a downgraded version of the A600. However, the design aspect remains a mainstay of Lenovo. This time they gave interface attraction with classical motive frame.

Class differences with the "brother" immediately apparent when we looked in the hardware specifications. To suppress the price, Lenovo uses Intel's Atom processor. But instead of using a type of N270 or N280 is actually intended for the netbook, C300 carrying a targeted N330 Intel for nettop. Naturally, if the performance was quite rushed C300 compared to other PC level AiO. Especially if you just used for standard computing activities.

Shown with 20-inch screen, C300 is well suited to satisfy the users of the multimedia side. The availability of an internal DVD drive into an advantage compared to C300 class competitors who generally only provide an external optical device.

But when tested, the ability to play HD video files, not as smooth as the way of hope. In some sections, the resulting picture somewhat broken. It does not matter if the play is a standard multimedia files such as AVI, WMV, and MP4.

Intrigued with its 3D performance, we played the game Doom 3 with the C300. The result? It turned out pretty good. Much more smoothly than when playing HD video.

Lenovo IdeaCentre C300 offers complete connectivity options. There are 6 USB ports, 1 port PS / 2 (for mouse), FireWire port, LAN, memory card reader 6-in-1, and also Wi-Fi facilities. With the range prince competitive prices in a number of U.S. $ 599, C300 worthy promoted as a leader among AiO various mid-level PCs.

Plus: beautiful design; use Atom N330; there is an internal DVD Writer; full connectivity
Minus: Lack of HD video plays okay; keyboard dirty easily; back less flexible

TEST SCORE
Performance: 3.8
Feature: 4
Ease: 4
Price: 4
TOTAL SCORE: 3.94

Test Results
SysMark 2004: 47
PCMark 2005: 2740
3DMark 2001: 2413
Encoding audio: 9 minutes 37 seconds
Encoding video: 32 minutes 42 seconds
Cinebench: 1561

Lenovo IdeaCentre SPECIFICATION C300
Processor: Intel Atom 330 1.6 GHz
Chipset: Intel Lakeport-G i945GC
Memory: 1 GB DDR2 GG7 MHz
Graphics Card: ATI Mobility Radeon X4530
HDD: 160 GB, up to 640 GB
Optical drive: DVD writer
Sound card: Realtek ALC662
OS: Windows XP SP2
Facilities: 6 USB ports, 1 FireWire port, LAN, 802.11b / g WiFi, memory card reader, audio ports, 1.3 MP webcam + mic, speaker, PS / 2 keyboard, USB mouse
Monitor: 20 "(16:9 ratio)
Dimensions: 49x36x55 cm
Weight: 6.4 kg
Warranty: 1 year
Price range: U.S. $ 599


Labels:

The Heaviest Snow in Recent Years in South Korea

Sunday, January 3, 2010

South Korea to stand against the flow heaviest snow in the last nine years. A large number of canceled flights and traffic standstill due to snow, 46 scheduled international flights from Gimpo Airport, Seoul, has been canceled. Country's meteorological agency said that Seoul has blanketed 21.5 cm of snow, Monday January 4, 2010, at 11 AM local time. That is the biggest outpouring of snow since 2001, who was then closed with the South Korean capital of 23.4 cm of snow. Seoul City Hall said it had 3600 officers assigned to clean the snow on the street and sprayed 2400 tons of calcium chloride to melt the snow. But the snow was still falling and the business does not seem effective. As a result of this snow many South Korean citizen activities stopped.


Labels:

Find a Business Trip a Success This Year

Independent business to be one alternative for us to get financial freedom, to think dynamically, we are able to see so many opportunities that we unknowingly. The dream was so beautiful, fascinating and promising, but not as easy to manifest what we think. Unfortunately there are still many people who start businesses with less precise way so that the results obtained are not optimal as expected.

Understanding the right business concept we could do by working with those who have manejemen professionals in the business. Conduct analysis and surveys are a great way to measure the popularity of our products in the eyes of consumers. The survey was often done by many companies to maintain the quality of their products in order to remain in use by consumers.

Business climate in 2009 was less favorable many entrepreneurs, a decline in income would make us have to think non-stop to find the right solutions in overcoming adversity. Always think about what we do, and we all need time to think about what we want from life. Desire financially, and how we will achieve it. Also we have to think about what we have done, judging who we are and learn from the past so that we can improve future business.

But you need not be discouraged, there must be some solution to get out of the climate of economic crisis that has occurred. This solution can be found in enigin which offers business opportunities for entrepreneurs like you, improving efficiency and investing your efforts in the year 2010. So let us find the trip a success in this year and good luck.


Labels:

Review QWERTY Phone From Motorola Q8

Friday, January 1, 2010

Review QWERTY Phone From Motorola Q8Review QWERTY Phone Motorola Q8

The newest QWERY phone from Motorola is Motorola Moto Q8. Beauty, power and intelligence collide with the Motorola MOTO Q8 – an elegant all-in-one device that merges business with pleasure. Boasting a full QWERTY keyboard, the feature-rich MOTO Q8 keeps your life with you in one sleek device by combining powerful business productivity applications via Windows Mobile with multimedia entertainment.

From stereo Bluetooth wireless technology, astounding audio sound and a 1.3 megapixel camera to blazing fast Internet connections, convenient WiFi through optional miniSDIO card connectivity and the ability to view and edit Microsoft Office documents from anywhere in the world - there’s no need to compromise when you can have it all in one device. The below is the technical data of Motorola Q8 Smarthphones.

Specification
- GSM Non 3G
- OS Windows Mobile 6 Standard
- Resolusi QVGA Landscape
- QWERTY Keyboard
- MiniSD Card Support up to 2Gb
- Bluetooth, GPRS, EDGE
- camera 1,3MP
- Mini USB for charging and data connection
- OS: Documents To Go
- Additional Accesories : MiniSDIO for WiFi and TV Tuner


Labels:

Blogger Theme By:Google Android .